Unlock Premium Teacher Access
🔓 Unlock Premium Teacher Access
Everything you need. One simple yearly plan.
Upgrade to Premium and get full access to all current and future content—designed to save you time, boost engagement, and support real classrooms.
✅ What’s included with Premium
-
Unlimited access to all content on the site
-
Exclusive teacher tools to plan, practice, and assess faster
-
Future Teachers Pay Teachers resources included
(All my current and upcoming TPT products will be added at no extra cost) -
New content added regularly—your subscription grows in value over time
💲 Simple, affordable pricing
$20 per year
Less than $2 a month for tools you can use all year long.
🎯 Who Premium is for
-
Classroom teachers who want ready-to-use resources
-
Teachers who like games, tools, and engagement
-
Anyone tired of buying the same types of resources over and over
Upgrade to Premium
In this demonstration, students will get a better understanding of what a geyser is and what makes it function the way it does. I was worried about trying this at the high school earth science level because it is a bit elementary, but the science is sound, and it works. Materials needed are:
- hot plate
- glass tubing
- Two single-holed stoppers
- half a soda bottle
- colored water
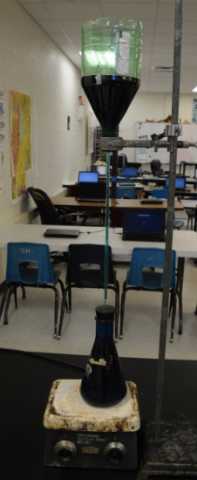
Build the geyser like the image above shows. Once you turn on the hot plate, it takes about 10 minutes before the geyser is hot enough to begin some action. What I did was demonstrate to my class how the geyser is built, and then showed them actual images of Old Faithful and other geysers around the world to buy some time while we wait for the geyser to erupt. I likened the hot plate as a magma chamber, the flask as an impermeable rock layer that traps the water from above, the glass tube as the "tunnels" that the water travels through, the plastic bottle as a hot spring that puts pressure on the water below so that it can get hot enough to flash to steam.
Some of my students responded, "That's it?" when it erupted, but the science is sound. I did have many students, though, who thought "cool." The most important part was that when asked how a geyser works on the assessment, I didn't get very many who could not explain it. This should be a good demonstration of how geysers basically work.
Below is a recording of the geyser eruption. One thing that we also discussed was how quickly the water disappears from the flask below, once it begins to flash into steam. A question that naturally should be discussed is, where did the flask get its air from when everybody could see that before the eruption, it was completely filled with water, and after the eruption, there is almost no water left? Another science concept that we discussed was why the water went from the top bottle back down to the flask so quickly after the "magma chamber" was turned off.