Flashback Express Video Recorder

In this tutorial, you will see how to use FlashBack Express 5. FlashBack Express is an excellent free program, with premium options, that will allow teachers to record their screen, PowerPoint presentations, websites, etc... This then makes it easy to upload to Youtube or even a stand-alone video that you can share with others especially with students.
This tutorial assumes you have already installed it. If you haven't downloaded the program and installed it, click the link: FlashBack Express Download.
- Open up FlashBack Express
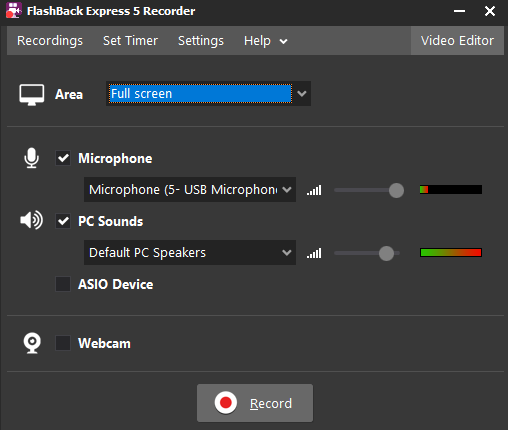
- There are three main things to look at on the intro screen.
- The "Area" option allows you to select the full screen which will record the entire screen. There is also a "Region" option which allows you to draw a box around a specific part of your screen that you want to record. Finally, you have the "Window" option that allows you to record a specific window from say a browser or another program
- The next two sections that are important are the "Microphone" and the "Webcam" checkboxes. if you want Flashback to record a narration you will wan the "Microphone" option selected. If you want to record yourself speaking about what is on your screen make sure you check the "Webcam" option.
- At the top of the recorder window, you will see some menu items.

- The "Recordings" option is where you will find the recordings when you are finished with a lecture or a tutorial.
- I haven't used the "Set Timer" option, but it allows you to set a time in which you want your screen to start recording.
- There are many settings that you can play with, but I only use one, which I will show in the next section.
- Let's explore the "Settings" options worth playing with. As mentioned above there are a lot of settings, but the only one I needed to change was the "Frames per second" setting. The default is set low, but if you are going to capture a video of yourself, you will definitely want to look good and the 30 frames per second option is much better than the default. I also set the quality of the video to "Max."

- When finished click the "Save" button.
- Now back to the beginning screen. Once you have all of your settings set, just click the "Record" button.
- If you have more than one monitor, make sure you select the monitor that is displaying that content that you want to record. When ready just click the "Record" button.
- Flashback Express will now begin recording your screen, audio, and webcam if all of those options were checked. Click the "Stop" button when finished.
- You are now presented with three options. You can play the video right away to see how glamorous you look when recording. You need to make sure you click save and you will also see the "Garbage" icon if you want to trash your recording.
- After clicking save, give your video a name, then click the "Save" button again.
- This so far didn't turn what you did into a video yet. Next, we need to click the "Recordings" option from the very first screen.

- This will pull up all of the recordings and lessons that you have made.
- Click the "Export" option. For Youtube the best option and quickest upload will be the MP4 format. Click "OK" button.
- The defaults for this screen are fine, but you can play with some of the options for sure. Click "Export" when ready.
- Give your video a name and decide where you want to save it at. Click "Save" when you are finished.
- Now that you have a video, you can just upload it to Youtube or share it on a website, vlog or Google Docs.


